

In the past two months I've made four cards and haven't posted about them. So, I'll do that now.
I'll start with the most recent first.
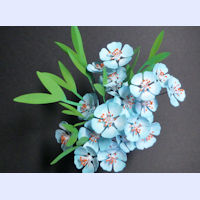
This year's Mother's Day card. Another box card from SVGCuts. This one is from the Spring Blossom kit.
(As usual, clicking on a picture will take you to a bigger photo in my family album; clicking on that picture will open a larger photo so that you can see more detail.)
The finished card
I used a Fineline applicator to put the glue in the middle of the flowers, for the rhinestones I bought on eBay, as well as attaching them to the card.
This made me really happy. It was a first time for me. The embossing folder I used was Sizzix Textured Impressions Flower Power. I inked the side of the folder that had the outlines of the flowers raised and ran it through my Big Shot. Look at how cool it turned out! This will be great for embossing trees, stone or brick walls....the ideas are endless!
The completed panels on the card.
Panels on the other side of the card.
Putting the inserts together
The tree. I love how the pink on brown looks and the flowers look awesome
Close up - see that shimmer? Oh, yeah....
The card is put together, now for the finishing touches.
The back side
The back side with the sentiment. The sentiment is embossed, not stamped. Well, I guess it's kind of stamped since I used my Versamark pad along with a stamp, which I poured my embossing powder over.
And the fun part...attaching the elastic for the magical self-opening card. Little pieces of toothpicks, attached elastic cut to size (bought by the foot on Amazon) and a small hole punch (see the bottom left of the card? That dark spot? That's a hole for the elastic). Once I get the elastic tied onto the toothpick, I put a drop of glue on that, then put it on the hole and pull the little part of the loose elastic through the hole so that it's on the inside of the card. You can see what I mean in the photo below this one, upper left hand side of the inside of the card.
Elastic attached
Card closed (see the elastic?)
The back of the finished cardOh, and check this out. An added bonus. ME!
 |


